Tero Hassinen shares his thoughts on developing extensions for Dynamics
365 Business Central using AL programming language and Azure Functions. Tero is
a senior solutions architect at Futuriot where he develops business management
solutions in Microsoft Dynamics NAV, AX and Business Central environments
As a Business Central developer I've been lately working solely on the cloud version of Business Central. What I've found is that there's a plethora of new awesomeness to tinker around with and you just need to figure out how these pieces fall into place. The whole Power Platform thing, Microsoft Flows, Power Apps, lot to learn and keep up with sure, but who wouldn't want to learn few new things. Some of it has proved very useful and not that complicated at all. We just created a fully functional purchase invoice approval system using Microsoft Flow and seriously a caveman can do it.
Bulk of my profession is writing extensions in AL. How would I leverage the new possibilities in extension development? I am developing in the cloud, so I guess the most obvious place to look would be the cloud and whats available in the Cloud. And therefore the answer is Azure Functions.
How do I access Azure Functions from AL code? As I weed trough the documentation and walkthroughs of everything Azure Functions has to offer, I constantly run into C# examples that use .NET. The problem is that .NET interop is not available for cloud solutions. Microsoft has this to say:
For cloud solutions .NET interop is not available due to safety issues in running arbitrary .NET code on cloud servers.
Ok, seems fair enough.
I guess one option would be to host the proprietary .NET code in Azure functions to achieve the needed result. No doubt that is sometimes the only avenue, but what I am planning to do here can be done through a REST API interface.
What is REST API and where to use it?
Here is what Microsoft says about REST API:
Basically, REST is an architecture you can use when calling APIs or making APIs available to be called. It's independent of what's happening on either side, and what other software is used when sending or receiving the REST calls. You can write an application that runs on a Mac, Windows, Linux, an Android phone or tablet, iPhone, iPod, or web site, and use the same REST API for all of those platforms. Data can be passed in and/or out when the REST API is called. The REST API doesn't care from what platform it's called – what's important is the information passed in the request and the data provided in the response.
Knowing how to use REST is a useful skill. The Azure product team frequently releases new features. Many times, the new features are accessible through the REST interface. Sometimes, though, the features haven't surfaced through all of the storage client libraries or the UI (such as the Azure portal). If you always want to use the latest and greatest, learning REST is a requirement. Also, if you want to write your own library to interact with Azure Storage, or you want to access Azure Storage with a programming language that does not have an SDK or storage client library, you can use the REST API.
OK, I am sold, lets get to work.
As the headline suggest, I am going to connect to Azure Service Bus from AL code and send and receive some messages. Hopefully I will one day use this code to integrate with another system. It seems at least D365 Sales has an ability to connect to Service Bus out of the box, so this is very promising. There seems to be more than one Service Bus connector available for SAP, even better.
What is Azure Service Bus.
Azure Service Bus is a messaging service, where you write into and read from queues, much like MS message queue. Azure Service Bus is however quite more sophisticated than MSMQ. It has a nondestructive read, which is excellent. The messages are locked for a period of time after read, but you can unlock the messages at will with a messageID and token, very handy. And the best part is that the message queue payload is binary, so you can send and receive pictures, pdf's, i guess virtually anything. Brilliant!
Setting up a Azure Service Bus and Queues.
After you have your Service Bus and Queues setup, there are four pieces of information needed for this integration:
1. Your service bus base address, e.g. https://mymessages.servicebus.windows.net/ where
mymessages itemizes the Service Bus Namespace.
2. Name of the Queue(s) to be used.
3. The name of your Shared Access Signature (SAS) policy. The default, which is created when you create the service, is called RootManageSharedAccessKey. This policy is an admin policy and its recommended to create a new one with less permissions. I named mine ever so cleverly MyAccessPolicy.
4. Shared Access Signature (SAS) key, which is used to sing portion of the Authorization header. There are two keys and you can use either one. All references to a key later in this post always refers to this key. The SAS Policy can be setup at a Namespace level or Queue level but in this example we use a namespace SAS policy.
I will be iterating some items in this post that some readers will probably consider self evident, but I personally find it really frustrating when a post, or a walk-through is missing a vital piece of information, simply because it was deemed common knowledge. This being my first blog post ever, I probably do plenty of errors, but I try to say everything I would've wanted to find somewhere in plain terms. Most recently, I followed these instructions for creation of the Authorization string https://docs.microsoft.com/en-us/azure/service-bus-messaging/service-bus-sas
and it wasn't exactly easy as in one example it leads you to believe the signature is a SHA256 hash, but then where would the key go? Its not quite clear which part need to be Url-encoded and which not. After vigorous trial-and error and with a little help from Powershell, I was able to figure it out, but the instructions could be better, especially to us who do not benefit from the included C# examples. Anyway, rant over...
How to create a REST API request with an Business Central HttpClient
The request itself is quite straightforward; a request header and a body. The Request header can be as simple as a Content Type and an Authorization header. The request body carries the payload of the Service Bus Queue message (the message itself, text or binary). However, the Authorization may easily become a tough one to get right. The authorization requires a computation of a HMACSHA256 Hash from a String To Sign, which needs to be absolutely correct. Any extra character in the string and the hash changes completely.
How to Create HMACSHA256 Hash
First order of business, how to create a HMACSHA256 Hash without .NET? The answer is rather simple. Codeunit 1266 Encryption Management. Encryption Management has external function that you call with your encryption key and your string to sign and as return you get a Base64 encoded HMACSHA256 Hash. Thank You Microsoft!
The third paremeter in the function call is the Algorithm type. Two stands for HMACSHA256. That's it, now to the string to sign.
The elements of the String to Sign
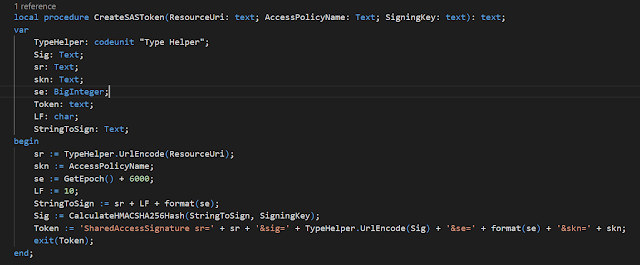
This is where the issues may rise, as any minor flaw in the string to sign will result in a completely different hash than expected. The following code creates an authorization token.
The first parameter, ResourceUri, is the address of the resource your request will try to access e.g. https://mymessages.servicebus.windows.net/myqueue.
AccessPolicyName is simply the access policy name from the Azure
portal, and SigningKey is the key under the Access Policy.
In order to UrlEncode the parts that require Url encoding(ResourceUri and the Signature) there is a
function UrlEncode in codeunit 10 Type Helper.
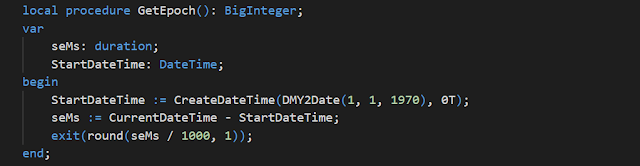
se = Token expiry instant. Integer reflecting seconds since the epoch 00:00:00 UTC on 1 January 1970 (UNIX epoch) when the token expires. The easiest way in AL to calculate the seconds is to calculate a duration, which is in milliseconds and divide the duration by 1000.
LF= linefeed, which in Microsoft documentation is '\n' but in AL is ASCII char 10. So char LF := 10.
StringToSign = your ResourceUri and Epoch seconds separated with a linefeed, and would in debugger look like this:
Finally the Token would look very close to this:
Now we can start building the request, which is not that complicated at all. First the request header:
And finally a request:
This Request sends a message. The message content is passed in a httpContent variable. Since we are only sending a message, the http response is pretty much void of any useful information. Makes perfect sense. The response header tells you the message was created in the queue and in most cases that's all one needs to know. The SBHttpClient is a variable of type HttpClient.
However, when reading messages, the response header is full of valuable information. It will contain a messageID, a lock token and will tell you when the message will be readable again and so forth. I will cover reading, deleting and unlocking a message in the 2nd part of this blog: https://dynamics365bc.blogspot.com/2019/08/connecting-business-central-to-azure_28.html